
Using IronWorker to Power Custom Service Integrations
The rise of the API economy in recent years has also given the integration economy a much needed breath of new life. What was once a painful process of dealing with proprietary formats and clunky middleware, has now become a streamlined process via openly consumable cloud-native REST APIs. As such, a new breed of services such as Zapier and IFTTT have come along to make API integrations as simple as a few clicks, while other products such as Slack have made integrations a first class citizen feature of the product itself.
The technology that powers many of these integrations behind the scenes is webhooks, essentially an event-driven callback – when this happens, notify that via HTTP POST. Webhooks are an incredibly useful feature with many services, however as developers, we’ll always find a scenario that’s beyond what’s provided out of the box. With service integrations, this often means performing custom data translations such as field mappings, or additional business logic such as filtering and tagging.
We see a lot of our customers bridge services together using IronWorker because of its direct webhook support, flexibility to run any custom logic in any language, ability to scale concurrently behind the scenes, and “serverless” environment. We say “serverless” in quotes because to a developer, there’s never a need to think or worry about provisioning resources to run and manage tasks at scale. When one of our users shared his custom integration using IronWorker on Twitter, I got in touch to hear more and share his story.
Using IronWorker to Integrate Stripe with Xero
Guillermo Gette, technical lead at Expedia and co-founder of ScriptedQA, needed a way to record Stripe transactions with Xero from his eCommerce, but could not find an official integration or a 3rd party service that behaved as desired. As a long time user, he turned to Iron.io to build his own.
Guillermo quickly wrote a PHP-based IronWorker to create the sales, fees, and transfer transactions from Stripe to Xero. Using webhooks, the worker will automatically execute when a successful charge is processed or a bank transaction is made by Stripe. Using IronWorker, this can be done without having to run manual imports or batch processing enormous files.
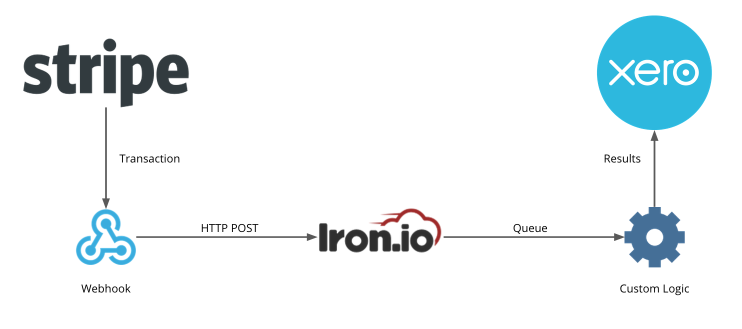
Below are the step by step instructions for setting up and running the IronWorker built by Guillermo. This process can be applied to any number of services with any custom logic.
Xero Setup
- Visit https://app.xero.com/Application/Add
- Select Private
- Complete Application Name and select your organization
- You will need to generate a public key certificate. To do this follow these steps: https://developer.xero.com/documentation/advanced-docs/public-private-keypair/
- Once you save, you will be able to get your consumer key and consumer secret.
IronWorker Setup
- Clone this repo: https://github.com/guillegette/stripe-to-xero
- Place your privatekey.pem and publickey.cer in the folder where you cloned the repo. By default I named this files xero_privatekey.pem and xero_publickey.cer, if you want to change this names you need to reflect this changes in stripe_to_xero.worker and stripe_to_xero.php
- Open config.json and update the file with your details
{
  "xero": {
    "consumer_key": "", //from your Xero private application
    "consumer_secret": "", //from your Xero private application
    "bank_account": "", //where Stripe transfer your money (code)
    "stripe_account": "", //the "fake" bank account that will have your Stripe transactions
    "sales_account": "", //the account code for your sales
    "fees_account": "" //the account code for your fees
  },
  "stripe": {
    "api_key": "" //you can get your Stripe private api key going to Account Settings -> API Keys
  }
}
Deploy to IronWorker
Make sure you have an Iron.io account, and the cli installed.
- Within the repo directory run $ iron_worker upload stripe_to_xero —worker-config config.json
- Run $ iron_worker webhook stripe_to_xero and keep this url handy
You can also find the webhook url in the Iron.io Dashboard by selecting the Code details.

Stripe Setup
- Go to Account Settings -> Webhooks
- Click on Add Endpoint and paste the url that you got before
- Click on Select event and mark charge.succeeded and transfer.paid
- Click on Update endpoint and you are ready to go!
- Checkout your Iron.io Dashboard to see your task running
Check out the complete example repo on GitHub: https://github.com/guillegette/stripe-to-xero
Thank you to Guillermo for building and sharing this IronWorker example. We’re always looking for cool use cases from the community, so feel free to share your own with us. We may just write about it!
“It doesn’t matter how many transactions per second we have, the worker will queue the jobs and they will get done one by one. Once we make the worker live there is no infrastructure to maintain.” – Guillermo Gette
About Guillermo Gette
Guillermo is a Software Engineer and serial entrepreneur who is currently based in Australia and has worked in Argentina and the United States.
Guillermo has over 10 years experience as a developer where he has worked for large companies such as Yahoo7 Australia and currently for Expedia. Guillermo co-founded Starbates through the incubator Start Engine in the United States, and GetCleanr and Help For Fitness Pty Ltd in Australia.
Recently Guillermo founded ScriptedQA – QA Engineers on demand for your business. ScriptedQA focuses on replacing functional manual tests of an application’s core features, with an automated test. This can be run on demand, and on any browser at the fraction of the time it would take to manually test.