
Treasure Data and IronWorker (repost)
Overview
Our friends at Treasure Data wrote a blog post about data collection in Ruby and how to run multiple data collection tasks in parallel (or scheduled) using IronWorker. The example from Treasure Data demonstrates what it takes to build a simple logging application in Ruby with IronWorker to manage and log the output to Treasure Data, which can then perform queries.
As noted in the blog, this example is not a complete solution but an illustration to show users what's possible when combining Iron.io and Treasure Data. Big thanks to John Hammink and the Treasure Data team for their work to educate the community.
Table of Contents
- Coding up Your Ruby Task
- Running your Ruby Task Locally
- Configuring your Iron.io Worker
- Uploading, Queuing, and Running a Single Instance of Your Worker
- Running Multiple Instances of Your Worker
- About Treasure Data
Here's an excerpt from the original post:
Achieve Cloud Elasticity with Iron
Speak to us to find how you can achieve cloud elasticity with a serverless messaging queue and background task solution with free handheld support.
Coding up Your Ruby Task
Create a directory called /SendLog and open a text editor. You can get your API KEY from here. Type in the following, and save it as SendLog.rb
require 'td'

#Initialization
TreasureData::Logger.open('iron_1',
                 :apikey=> ,
                 :auto_create_table=> true)

# Example:  login event
TD.event.post('login', {uid:'123'})

# Example 2:  follow event
TD.event.post('follow', {uid:'123', from: 'TreasureData', to: 'Rijksband'})

#Example 3: pay event
TD.event.post('pay', {uid: '123', item_name: 'Myth of Sisyphus', category: 'myth', price: '18', count: 3})

TreasureData::Logger.logger.flush()
This script, when run, will do exactly four things:
- Create a database on Treasure Data called iron_1;
- Create a table called login and add a single record to it. Note that there are always two values added to any user-defined values by default: v, which is a map of key-value pairs containing the timestamp and any user-defined values; and time, which is the timestamp. The user-defined value, in this case, is uid.
- Create a table called follow and add a single record to it, this time with three user-defined values: uid, from, and to.
- Finally, create a table called pay with one record, and add five user-defined values to it: uid, item_name, category, price, and count.
Running your Ruby Task Locally
If you haven’t installed ruby gems, you should do so. Also, you will want to install bundler.
Open up a text editor in your current /SendLog directory and create a file called Gemfile:
source 'https://rubygems.org'

gem 'td', "~> 0.11.1"

gem 'iron_worker_ng'
Next, run the following command (also in the same directory):
$ bundle install
Now, run your Ruby script once:
$ ruby SendLog.rb
Finally, log into Treasure Data console and, after connecting to iron_1 database, issue and run each of the following queries:
- SELECT uid FROM login
- SELECT * FROM login ORDER BY time
- SELECT * FROM follow
- SELECT time from (SELECT * from follow) as sub ORDER BY time
- SELECT uid, category, price, count, item_name FROM pay
- SELECT count(1) from pay
For each query you ran, did you get the expected result? What did you see? Did you encounter any errors? (Note that Treasure Data console limits output to 100 records.)
You may run into errors. Sometimes, an easy way to discover any errors or bugs you may have made in your own code and/or console commands is to reread your code and examples backward.
Since you have run the script only once, you should have only one record in each table.
Configuring your Iron.io Worker
Now you’ve run your task once, but you want to see how it goes when running it in multiple instances in the cloud. Enter Iron.io!
You will need to take a few preliminary steps to get an Iron.io instance up and running.
- Go to Iron.io. Register for an account and log in.
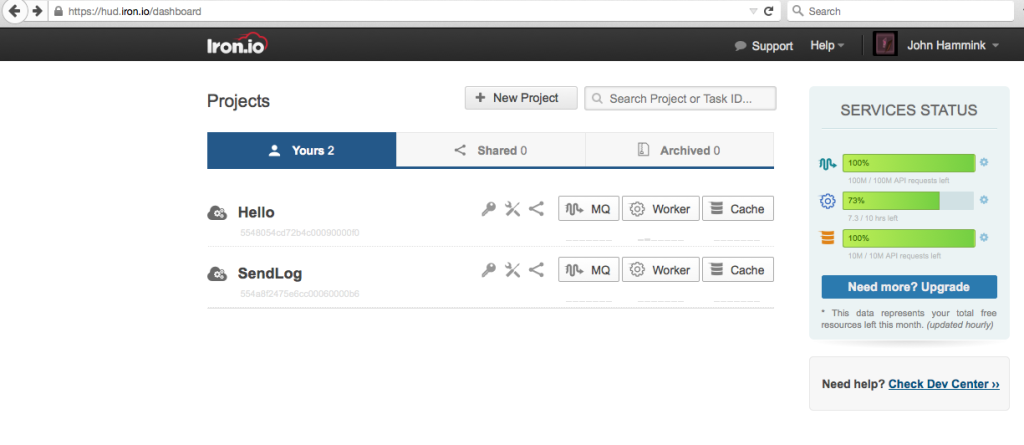
- Navigate to https://hud.iron.io/dashboard and click “New Project”. Name it “SendLog”.
- Click the Worker button next to SendLog project.
- You should be looking at the “Get Started” tab. Do step 1 (download Iron.json to your /SendLog directory and run $ sudo gem install iron_worker_ng).
- In the same /SendLog directory where your Gemfile, Iron.json, andSendLog.rb now exists, create a fourth file: SendLog.worker. Open up a text editor and enter the following:
runtime "ruby"

gem 'td', "~> 0.11.1"

exec "SendLog.rb"

remote
Iron.io Serverless Tools
Speak to us to learn how IronWorker and IronMQ are essential products for your application to become cloud elastic.
Uploading, Queuing, and Running a Single Instance of Your Worker
This next step is what is required to run your Ruby script – your packaged worker – in the cloud.
- Run the following from the command line:
$ iron_worker upload SendLog; iron_worker queue SendLog – -priority 2 – -wait
(note: omit the space between dashes)
- Once the process is complete, you should see the following output from the console:
——> Creating client
Project ‘SendLog’ with id=’554a8f2475e6cc00060000b6′
——> Creating code package
Found workerfile with path=’SendLog.worker’
Adding ruby gem dependency with name=’td’ and version=’~> 0.11.1′
Detected exec with path=’SendLog.rb’ and args='{}’
Code package name is ‘SendLog’
——> Uploading and building code package ‘SendLog’
Remote building worker
Code package uploaded with id=’554a910d0f9128000700a686′ and revision=’13’
Check ‘https://hud.iron.io/tq/projects/554a8f2475e6cc00060000b6/code/554a910d0f9128000700a686′ for more info
——> Creating client
Project ‘SendLog’ with id=’554a8f2475e6cc00060000b6′
——> Queueing task
Code package ‘SendLog’ queued with id=’554a9d6d6b3a88000b00f4c1′
Check ‘https://hud.iron.io/tq/projects/554a8f2475e6cc00060000b6/jobs/554a9d6d6b3a88000b00f4c1′ for more info
——> Getting log for task with id=’554a9d6d6b3a88000b00f4c1′
I, [2015-05-06T23:02:11.705509 #18]  INFO — : Creating table iron_1.login on Treasure Data
I, [2015-05-06T23:02:12.364480 #18]  INFO — : Creating table iron_1.follow on Treasure Data
I, [2015-05-06T23:02:12.714396 #18]  INFO — : Creating table iron_1.pay on Treasure Data
Did it run correctly? Did you get any errors? If you check your tables in Treasure Data console, you should see that each one now contains two records.
Running Multiple Instances of Your Worker
Now that your job is up on Iron.io, it’s easy to schedule multiple instances of the worker.
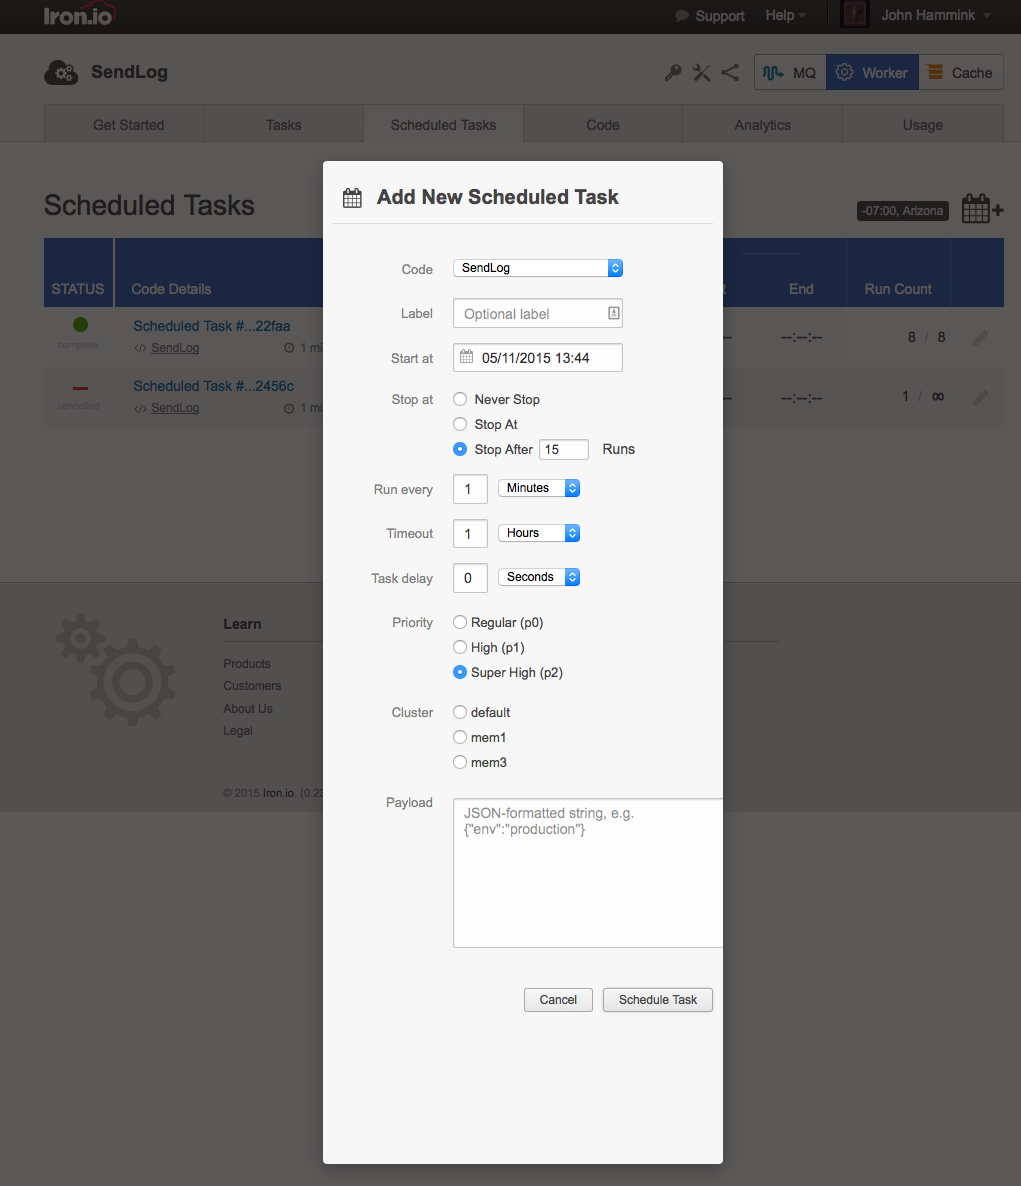
- In the “Scheduled tasks” tab, click the calendar icon to the top right of the task list.
Note: Your task list may be empty. - In the “Add New Scheduled Task” dialog that appears, select your “SendLog” job in the drop-down, along with Stop parameters, Run parameters, Priority (p2 jobs are generally run immediately), and the cluster. Mem3 will be a more dedicated cluster. (Don’t worry about payload at this point.) Once you’re ready, click “Schedule Task”.

- To run many tasks in parallel, schedule multiple tasks with overlapping run times.
While this is going on — and once it’s complete — try running some of the same queries from the section “Running your Ruby Task Locally.” You should now see the databases populated with many records, with more adding as additional tasks get run.
This is only a taste of what’s possible to do with Iron.io and, by no means a complete example. There are many instances where logging messages from an Iron.io worker could be useful: For instance, perhaps you want to send a diagnostic message if something goes wrong on a job (and some error code is executed), or you want to log the timestamp when a job is complete.
We look forward to bringing you future examples and best practices on how to leverage the Iron.io platform to address your asynchronous tasks and workflows. Stay tuned...
About Treasure Data
![]() Treasure Data was founded in 2011 with the mission of building the first prebuilt cloud service for massive-scale collection, storage, and analysis of big data sources, including web, mobile, IoT/sensor data, logs, and events. The cloud service is monitored and supported by Treasure Data staff. This gives its customers an end-to-end big data processing capability at a fraction of the cost of building and maintaining it themselves.
Treasure Data was founded in 2011 with the mission of building the first prebuilt cloud service for massive-scale collection, storage, and analysis of big data sources, including web, mobile, IoT/sensor data, logs, and events. The cloud service is monitored and supported by Treasure Data staff. This gives its customers an end-to-end big data processing capability at a fraction of the cost of building and maintaining it themselves.
Unlock the Cloud with Iron.io
Find out how IronWorker and IronMQ can help your application obtain the cloud with fanatical customer support, reliable performance, and competitive pricing.